
Caching is an indispensable feature of cost-effective application hosting and fast, low-latency user experiences. In-memory caching is one of the most widely used techniques, and Memcached’s in-memory caching capabilities are used by thousands of developers, hosting providers, and web services giants like Facebook®, Shopify®, and Slack®.
In this article, we explore how Memcached works and how you can integrate it with PHP apps hosted on your cPanel & WHM server.
Before we begin, a word of warning: the method outlined here should only be used on single-tenant dedicated servers, such as cPanel solo and virtual server hosting. It is not suitable for multi-tenant shared hosting environments without additional configuration to enable authentication or encryption.
What is Memcached?
Memcached is an object caching system. It is primarily used to cache the results of database queries, helping dynamic websites like WordPress® and Drupal to serve pages faster. It can also significantly decrease resource use on a busy web server by reducing calls to the database.
Like all caches, Memcached stores data generated by an expensive operation so that it can be used again without repeating the operation. For example, to build a web page, a PHP application often has to query a relational database like MySQL. Relational databases usually store data on a hard drive or SSD, both of which are slow compared to the server’s RAM. Memcached puts often-used data in RAM, allowing it to be accessed a lot faster.
Caching with Memcached works like this:
- A web browser requests a page, and the server runs PHP code to build it.
- PHP asks Memcached for the page’s data via a Memcached extension.
- If the data is cached, it is sent back to PHP.
- If it isn’t cached, Memcached sends the query to the database, returns the data to PHP, and stores it for the next request.
When its allocated storage is full, the cache discards the least recently used (LRU) data. Items in the cache also have an expiry date so that stale data is removed.
Now that we understand what Memcached does, let’s see how to install and configure it on a cPanel web server that hosts PHP apps such as WordPress, Drupal, and Adobe Commerce (formerly Magento).
Install and Configure Memcached in cPanel
Before we begin, let’s take a look at what we’ll be doing to get Memcached up and running with PHP applications hosted on your server. The plan is to:
- Install the Memcached daemon (a daemon is software that runs in the background).
- Configure the daemon to work securely. The default configuration is not secure.
- Install the EasyApache4 Memcached PHP extensions.
- Test to make sure it’s working as expected.
- Configure PHP apps to use the cache.
First, we’ll install the Memcached daemon, the software that caches PHP objects in memory. Log in to your server with SSH and run the following as the root user:
yum install memcachedNext, we’ll register Memcached with CentOS’s Systemd service manager so that we can control when it starts and stops.
systemctl enable memcachedCreating a Secure Memcached Configuration
Memcached lacks built-in security features, which is why it’s not a good idea to use it on shared hosting platforms. Its default configuration accepts connections from everyone on the internet, a vulnerability frequently exploited in distributed denial of service attacks. We’ll add some startup options to create a more secure configuration.
Open the config file in your preferred text editor.
nano /etc/sysconfig/memcachedEdit the last line of the file so that it reads:
OPTIONS="-l 127.0.0.1 -U 0"The “-l 127.0.0.1” option binds Memcached to the local network interface. The -U option disables the UDP protocol, which is commonly used in DDoS attacks.
While we have the configuration file open, we can also change the amount of memory available for caching. The default is 64 megabytes, but you can change it by editing the CACHESIZE option in this file. For example, to double the available memory, change the line to read:
CACHESIZE="128"Save the file, and we’re ready to start (or restart) the daemon with the secure configuration:
systemctl restart memcachedHow to Install Memcached PHP Extensions in cPanel
We need to install the EasyApache4 Memcached PHP extensions. PHP doesn’t support Memcached natively, and the extensions allow them to work together. A couple of pieces of information will help you to understand what we’re about to do:
- There are two PHP Memcached extensions, confusingly called “memcached” and “memcache.” There are some differences, but they do essentially the same job. We’ll install both.
- PHP versions need a matching extension, so if you use multiple PHP versions on your server, you should install extensions for each one.
We could install the extensions on the command-line with “yum,” but it’s easier to install the right ones in WHM.
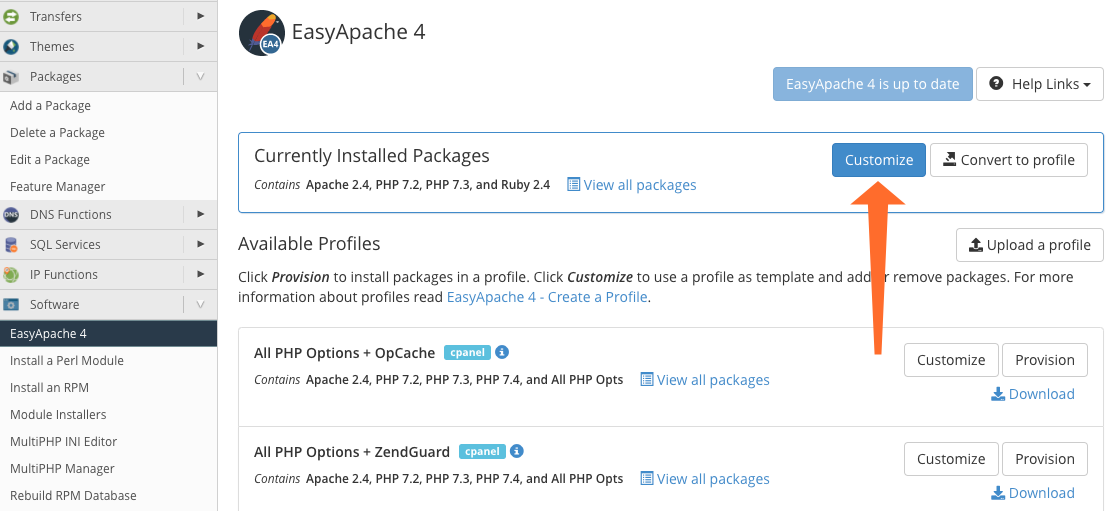
In the WHM sidebar menu, select EasyApache 4 in the Software section. Click the Customize button in Currently Installed Packages.
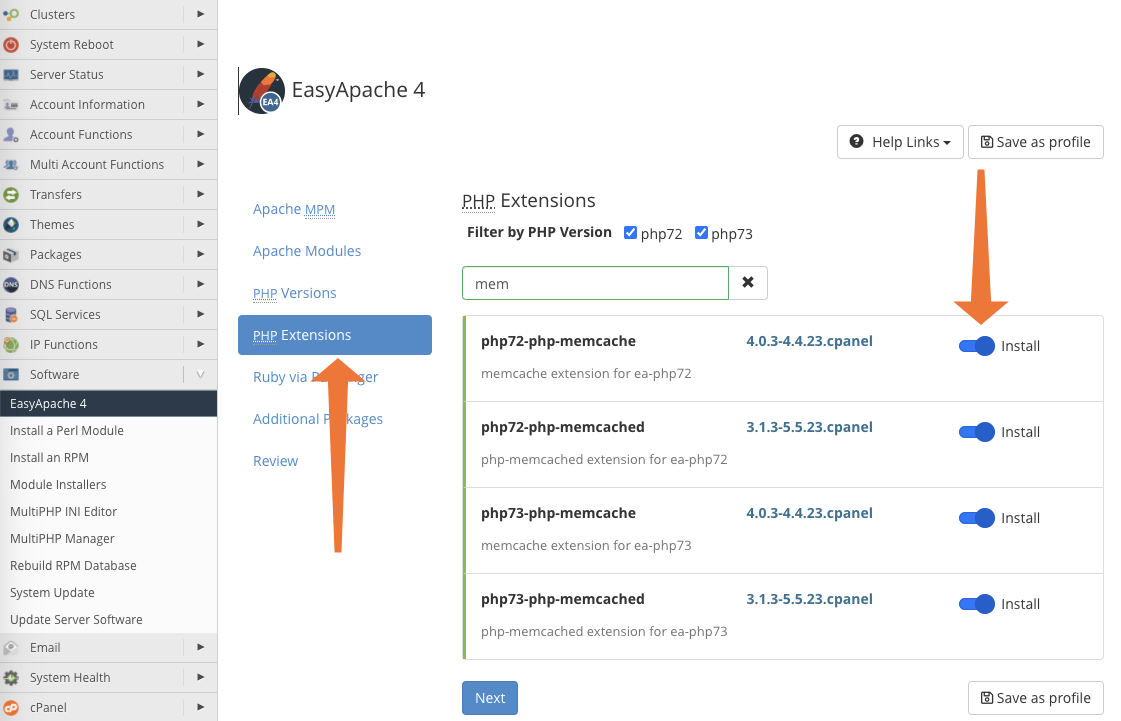
Select the PHP Extensions tab and search for “memcached”. cPanel shows you extensions for installed PHP versions. Click the switch on those you would like to install.
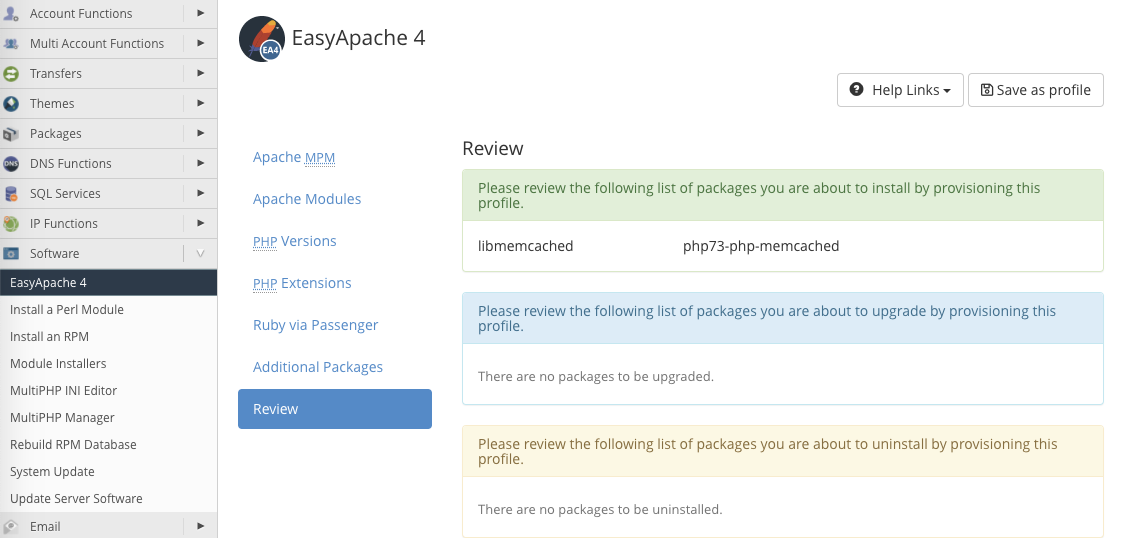
Select the Review tab, and then click the Provision button at the bottom of the page. cPanel will install the extensions and their dependencies.
With the extensions installed, return to your SSH session and restart memcached:
systemctl restart memcachedThe building blocks are in place, and memcached should be ready to start caching, but let’s make sure that everything went as planned. First, we’ll verify that memcached is working with PHP.
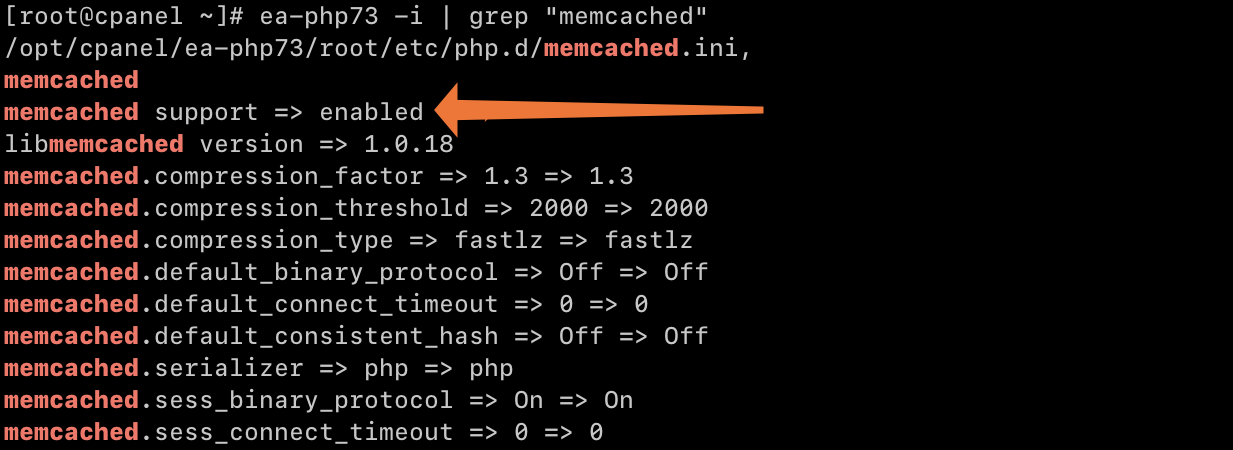
ea-php73 -i | grep "memcached"We’re asking the system’s EasyApache4 PHP 7.3 installation to display its internal configuration data and filtering the results with “grep” to extract the relevant lines. For different versions of PHP, replace the “73”. For example, if your apps use PHP 7.4, the command should start with “ea-php74”.
If all is well, PHP will print a lot of data, starting with lines that look like this:
To see similar information in your web browser, create a file called phpinfo.php in your domain’s public_html directory with the following contents:
<?php
    phpinfo();
?>
Save the file and visit it in a browser tab.
http://example.com/phpinfo.phpReplace example.com with your domain. You should delete this file once you no longer need it. It contains information about your server that could reveal security vulnerabilities to bad actors.

If you’re curious how much information is cached and other statistics, you can find out with the command:
memcached-tool 127.0.0.1:11211 statsHowever, we haven’t hooked any PHP applications up to the cache yet, so you won’t see much activity. Let’s fix that.
How to Configure PHP Apps to Work With Memcached
We have Memcached running on the server, but apps won’t use it until we tell them to. The process differs depending on the app, but Memcached extensions are available for most popular content management systems and ecommerce stores.
- WordPress: W3 Total Cache, Cachify, Batcache, and many other plugins support Memcached.
- Drupal: The Memcache API and Integration module enables caching, management, and statistics.
- Joomla: Joomla includes native memcached support.
- Adobe Commerce: Memcached integration is supported with just a few configuration edits.
Follow the Memcached documentation for your PHP app or plugin. They may autodetect Memcached, and all you’ll have to do is turn caching on. However, you may need to enter the IP address and port the cache is connected to, which is 127.0.0.1:11211. The port is the part after the colon: 11211.
Memcached can significantly reduce the load on busy servers, helping server administrators to control hosting costs while accelerating PHP apps for an improved user experience. cPanel and WHM’s EasyApache4 PHP management tools make it easy to install and manage the extensions you need to use Memcached with PHP.
As always, if you have any feedback or comments, please let us know. We are here to help in the best ways we can. You’ll find us on Discord, the cPanel forums, and Reddit.
